

I'm quite excited today to introduce an awesome project by Linda Ledbetter!
I first met Linda at Ranger U. and have since run into her at a craft show or two, but always look forward to reading her blog and seeing what she creates! She's so sweet and has such a great eye for vintage style! : )
First off - we'll start with the supply list, provided by Linda:
Tim Holtz/Sizzix Alterations Bigz Die: Raven and Scaredy Cat
Sizzix Vagabond Die Cutter
Stenciling Vinyl
Stencil Transfer Paper
Armour Etch Glass Etching Cream
Ranger Craft Scraper
An old paint brush
Scissors
A glass candle holder (I got mine at the Dollar Store)
       |
Below are her instructions for the project!

Hi crafty friends! I’m so excited to be here at the mighty Simon Says Stamp blog to share one of
my all-time favorite ways to use Tim Holtz’s Sizzix Alterations Dies (or most any die you like!).
It’s super easy to create cool, custom etched glass using inexpensive candleholders and a few
supplies from Simon Says Stamp. Warning, though: Once you dive in, you’ll want to etch every
glass surface in your house! Here’s how to get started…

Begin by cutting a piece of adhesive-backed vinyl with the die you’ve chosen for your etched
image. Leave plenty of vinyl border around the shape, as we’ll be using the outline of the die-cut
piece for our stencil. Carefully remove the vinyl from the die sandwich in one piece, and set it
down flat with the vinyl side up.
image. Leave plenty of vinyl border around the shape, as we’ll be using the outline of the die-cut
piece for our stencil. Carefully remove the vinyl from the die sandwich in one piece, and set it
down flat with the vinyl side up.
The die I used here contains two shapes, but I’m only going to use the cat for this project. I’ll set
aside the raven for another time.
aside the raven for another time.
Cut a piece of transfer paper to roughly the same size as your vinyl, peel off the backing and
apply the sticky side to your vinyl, being careful to keep it flat and free of air bubbles. Smooth it
out with your fingers.
apply the sticky side to your vinyl, being careful to keep it flat and free of air bubbles. Smooth it
out with your fingers.

Here’s the back side of the vinyl. The transfer paper holds the shapes in place while I cut away
the raven for a future project. I’m leaving as much boarder around the cat shape as I can.
the raven for a future project. I’m leaving as much boarder around the cat shape as I can.

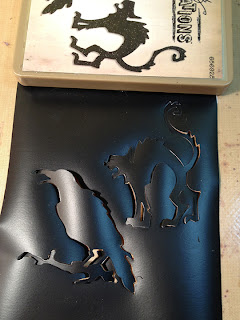
We’re still on the back side of the vinyl, but here I’ve removed the backing paper from the vinyl,
then carefully removed the diecut, leaving behind the outline and any separate pieces that add
definition to the design, like the sliver of space between the cat’s knees.
then carefully removed the diecut, leaving behind the outline and any separate pieces that add
definition to the design, like the sliver of space between the cat’s knees.

Apply your nifty stencil to clean, dry glass and burnish it well with a craft scraper or old credit
card. Make sure the edges are stuck down well.
card. Make sure the edges are stuck down well.

Gently, slowly remove the transfer paper, and you’ve got yourself a beautifully stenciled design,
just waiting to be etched!
just waiting to be etched!

Apply glass etching cream with an old paintbrush, making sure the entire design is covered. Set
your project aside for five minutes and eat some chocolate.
your project aside for five minutes and eat some chocolate.

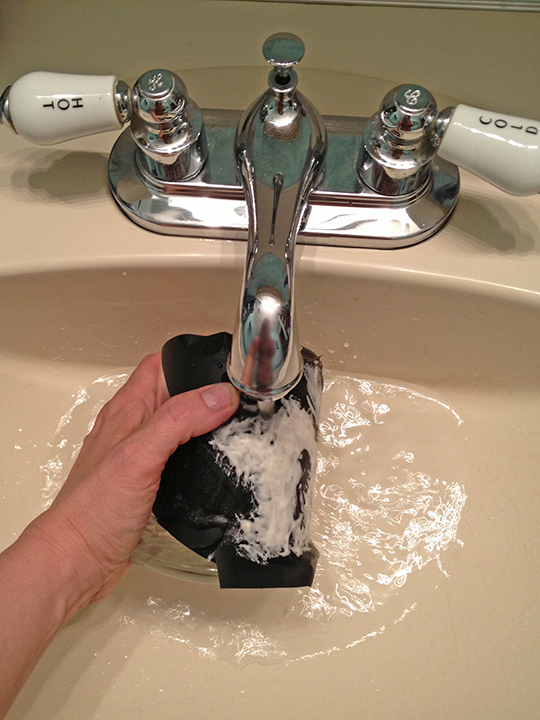
Rinse away the etching cream completely, then remove the vinyl.
Voila! A snazzy new candle holder, just for you!
This is just the beginning. Imagine making etched wine glasses for your next party, or adding
a little etched pumpkin design on your Halloween candy dish. Oh, the possibilities! Like I said,
you’ll be hooked…
I hope you have a fabulously crafty day!
WOW! What a cool idea! Thank you so much, Linda, for this great fall project!
Make sure to check out Linda's blog and play along in the Compendium of Curiosities 2 Challenge she hosts!
Would ya like to win some blog candy? Leave a comment and join our following for a chance to win...a surprise prize!! The winner will be announced Monday.

Hope you have a great weekend!
-SarahSarahN@SimonSaysStamp.com

Pin It
SUBSCRIBE TO:
This Blog | Our Newsletter
WE'RE SOCIAL:
Facebook | Twitter | YouTube | LinkedIn | Pinterest | Google+
TAKE THE CHALLENGE:
Simon Says Stamp Challenge! | Vintage Simon Says Stamp & Show Challenge
What an absolutely fantastic technique Linda, must have a go at this one!! Brilliant...
ReplyDeleteCool. Love this idea! Thanks for sharing.
ReplyDeleteThis technique looks so effective, I can't wait to give it a try!!!
ReplyDelete** Kate **
That was amazing and far easier than I would have thought.xx
ReplyDeleteThanks for.sharing with us Linda!
ReplyDeleteThanks for the tips on making the stencils! I haven't done this technique for a long, long time!!
ReplyDeleteI love that! I need to get some of that etching cream!
ReplyDeleteWhat a great technique!
ReplyDeleteGreat projects Linda. I have made quite a few things etching with vinyl here for gifts.
ReplyDeleteGreat project - love the results!!
ReplyDeleteAwesome technique, Linda! Thanks for sharing it with us! Looks like it's time to break out those snowflake dies :)
ReplyDeleteWhat a fabulous Technique...Thanks for sharing ...i really loved it!!
ReplyDeleteThat's pretty snazzy, right there! thanks for the great step by step. Now I know what everyone's getting for Christmas!
ReplyDeleteGreat idea!! What a neat project!
ReplyDeleteI have actually tryed this a couple of times, and I agree it really makes some gorgeous results and it´s so easy to do. I love how it looks when it´s all done.
ReplyDeleteLinda just rocks and is so inspirational! Love this!
ReplyDeletethis is such a cool idea! I can just imagine using so many of the great dies on items for holiday gifts. :)
ReplyDeleteThank you Linda for a great n easy turorial. I have to try this and I even think I have some etching cream around here somewhere...
ReplyDeletewhat a neat idea!
ReplyDeleteWhat a fun idea- love the glass!
ReplyDeleteLinda- WOW!!Looks so complicated but you explain it so well! On my way out to get some etch cream and transfer paper! Have some Christmad projects in mind.
ReplyDeleteThanks for your tutorial!
Chris
that is super cool!
ReplyDeleteI love to etch glass. What a great way to get the design you want.
ReplyDeleteA lovely technique, thanks Linda for sharing the step by step!!
ReplyDeleteHow neat is this. Thanks for sharing this with us. I will have to try this in the very near future. It turned out really good.
ReplyDeleteI really need to try this! THanks for the great tutorial!
ReplyDeleteHot ziggety! What great gifts or door prizes these would make!?!?? Gotta get shopping!
ReplyDeleteOh wow. It looks so easy! What a great halloween mug. :)
ReplyDeleteWow!! Brilliant stencil work, what a fab idea!! Hugs Hazel xx
ReplyDeletegreat project Linda! Looks so easy to do.
ReplyDeleteyou have a very creative Blog!
ReplyDeleteHa! Love the part about eating chocolate. One can eat a lot in five minutes!
ReplyDeleteYour project is wonderful. Oh the possibilities...
Thats brilliant I've been hoarding some armour etch so I shall be digging it out. Thanks linda for the inspiration great projects x
ReplyDeleteWonderful project
ReplyDeleteI've done some etching and it is, indeed, addictive. Luckily, a friend and I shared the etching cream and it is in her possession. ;-) Thanks for the introduction to Linda. I'm off to check her blog for more ideas.
ReplyDeleteBeautiful project with a great technique!
ReplyDeleteVery cool technique!!! And who doesn't like surprises, especially when it is blog candy?? Thanks, SSS!!
ReplyDeleteLove the glass! I tried this on wine bottles awhile ago and loved the results:)
ReplyDeleteGreat technique! So many possibilities with this one.
ReplyDeleteThese are gorgeous. Love the design.
ReplyDeleteThat is so neat. I'll have to give it a try.
ReplyDeleteFabulous idea & tutorial!
ReplyDeleteWow! That turned out great.
ReplyDeleteThis is so cool. I am going to give it a try on a smooth square vase that I am going to use for Halloween candy.
ReplyDeleteWhat a fabulous idea! I am going to try this but on glass christmas balls. I think these will look cool on the X-Mas tree (using a different die of course, lol).
ReplyDeleteThanks for the great idea and instructions! I am definitely going to try this for the upcoming holidays!!
ReplyDeleteI think this technique is not easy, you need at least to find etching cream. But result is awesome!
ReplyDeleteGreat idea, I think I will make some for christmas.
ReplyDeleteChristina P.
What a great crafty project! Thanks for sharing!
ReplyDeletelove this technique, can be used for any holiday or event. thanks for sharing and the chance to win.
ReplyDeletegreat project, thanks for sharing it with us today.
ReplyDeleteNow why didn't I think of that?? Head-slap! Great project, Linda, and I will be etching soon.. Thanks for sharing it!
ReplyDeleteThanks for this great tutorial! I've always been a bit nervous about using etching cream, but this looks very easy and the results are fab! ;-)
ReplyDeletevery cool project!!!
ReplyDeleteThanks for the tut Linda!
ReplyDeleteGreat glass etching project! I always forget that I have etching cream - I need to get to work!
ReplyDeleteGreat way to stretch your dies. You can pick up glass vases so cheap at Goodwill.
ReplyDeleteLove this project. TFS
ReplyDeleteThis is such a cool project! I've never tried glass etching, but she makes it look so easy. :)
ReplyDeleteThis is a fabulous idea! thanks for the great tutorial, Linda. (Love the step regarding chocolate!) I've tried etching glass before, and now I can't wait to try this technique!
ReplyDeleteThis technique looks like lots of fun and definitely addictive!
ReplyDeleteWhat a fantastic tutorial - just as you'd expect from Linda... fantastic effect too!
ReplyDeleteAlison x
I have often wondered how you do that etching and would like to try it myself. Thanks Linda for providing us with this great Tutorial> I can't wait to try it!
ReplyDeleteCool etching idea! I've always wanted to try this! Thanks for the tutorial!
ReplyDeleteDeniseB
I never realized that glass etching could be so effortless! I love that cat!! EEEEK!!
ReplyDeleteVery cool project! I am imagining tons of possibilities!!
ReplyDeleteGlass etching looks like a lot of fun... but am I too accident-prone to risk it? :D
ReplyDeleteLove glass etching it's been awhile since I've done it.
ReplyDeleteWow! I never heard of glass etching cream! Learn something new everyday. This is something I would love to try. Thanks for the inspiration....I love that glass.
ReplyDeleteJust in time for Halloween!
ReplyDeleteI have done this before and it is a great technique.
ReplyDeleteLinda's always got great ideas and this one's no different! I met her and her mom on the last Tim cruise... she is adorable!
ReplyDeleteStephanie Rodgers
Hey! This is so cute! I didn't have a clue that there was glass etching creme. it's a great project and idea!!!
ReplyDeleteLOVE the idea!! THANKS for sharing the AWESOME tutorial!! Have a FABULOUS WEEKEND!! =)
ReplyDeleteVery cool idea! TFS!
ReplyDeleteGreat instructions! Love the look of that cat too. Thanks for sharing!
ReplyDeleteKatie B.
Nice project. I'd love to try it sometime. Looks easy to do.
ReplyDeleteLinda T
Very creative and cute project!
ReplyDeleteShe's fun and she makes me want to do the etching, especially the "eat chocolate" part!
ReplyDeleteThat etching looks so fun! May just have to try it!! Thanks for sharing!
ReplyDeleteSuch a cool idea! How is it that I always 'need' everything in the supply list. Thanks for enabling!!
ReplyDeleteThat etching project is so much fun and super easy too! I had so much fun doing the last Studio L3 challenge using the Perfect Pearl painting technique from Tim Holtz's CCII ! Linda is a great challenge hostess with the mostest!
ReplyDeleteWow, what a fab project! I've never heard of glass etching cream before, looks easy enough to use.
ReplyDeleteOMG.. this is so awesome! Thank you for showing us ;)
ReplyDeleteoh wow! this is cool! wish I had known about etching cream and this tutorial when I got married! :)
ReplyDeleteGreat step by step by Linda! Adding the blog to my email subs! :o)
ReplyDeleteAlison x
What a great tutorial! Sure wanna give it a try now! I'll be very careful not to get hooked and start etching on everything! Hugs, Sandra
ReplyDeleteSuch a great idea! Thanks for sharing! :-) xx
ReplyDeleteI love that scaredy cat!!! Awesome idea, thanks!
ReplyDeleteLove this! Just in time for the holiday decorations!
ReplyDeleteOkay this is just awesome, thanks so much for sharing this, along with the instruction on when to eat the chocolate lol. I cannot wait to try this. I have been looking for another project to get my two teen nieces into and this is perfect.
ReplyDeleteWow!! Awesome project!!! Great idea!!
ReplyDeletehow freakin' cool is that!! i don't have the cat die but do have some others to try this with!! thanks for the tutorial!
ReplyDeleteI am heading to the Dollar Tree as soon as I hit "publish!!"
ReplyDeleteGreat step by step!!!
ReplyDeleteI will have to try etching at home!
this is awesome! thankyou so much!
ReplyDeleteI enjoy doing glass etching...yours looks flawless!
ReplyDeleteOh that's too cool! Love it!
ReplyDeleteFantastic idea! I'm definately going to make some Chritmas Hurricane candle holders!
ReplyDeleteI have seen similar projects but they always use a Silhouette. So glad I can do this one!
ReplyDeleteF.A.B.U.L.O.U.S. I'm going to try....and eat some chocolate! lol....no seriously!
ReplyDeleteLaura
Oh man. Lovely stuff. Just glad I haven't gotten into vinyl cuz that looks addicting!
ReplyDeleteI've got the vinyl but have avoided using it as I know I will have too much fun! But one never knows...
ReplyDeleteGreat project.
Now this is Awesome ......
ReplyDeleteWhat a great idea! I think I just got an idea for Christmas presents for those who already have everything! Thank you so much!
ReplyDeleteOh my! Now I have to get out my glass etching kit!
ReplyDeleteWhat an awesome idea! TFS!
ReplyDeleteI was planning some etching for Christmas but hadn't figured out exactly how to go about it. Thanks for the tutorial!
ReplyDeleteBeautiful result=)
ReplyDeleteI love to do glass etching...one year everyone got custom etched glasses. So much fun.
ReplyDeleteGreat technique!! So so cool! Thanks for sharing :)
ReplyDeleteLooks so cool!
ReplyDeleteI just need a Vagabond!! I'm hoping in time it will drop in price--thanks for sharing!
ReplyDeleteFantastic !!!
ReplyDeletevery cool project!
ReplyDelete