

Hi bloggers, happy Wednesday to you! Where did the first half of the week go? I hope it's going well for you! I'm going to dive right into this fantastic project today that the amazing Paula Cheney has made for us! (See the completed project above!) Not only will you see the finished product, but get a fabulous tutorial from the artist herself. Paula was generous to include step by step directions and pictures so I'm including it all! Enjoy!
Hi, Paula here from One Lucky Day. Super excited to share my Assemblage Clock today.
I
just returned from spending 12 days in France with my husband and 11
year old niece. I wanted to make something for her as a reminder of our
trip and her first trip abroad. So, follow along with me as I try and
create the magic of Pairs for a little girl.
Let start with the clock itself:

- Cut four - 4 x 6" pieces of Foil Tape sheets. Foil Tape is one of my favorite products to work with because you can do so many things to transform the surface: paint, alcohol ink, embossing, etc.
- I decided to emboss the Foil with the Sizzix Riveted Metal Texture Fade. I think this is the perfect embossing folder to remind her of the Eiffel Tower, which is of course made of metal, bolts and rivets.
- Slip a sheet of the Foil (shiny side up) into the Texture Fade and run it through the Vagabond Machine. Easy as that.
- You will need at least 3 pieces to cover the clock. (4 will give you a safety net).
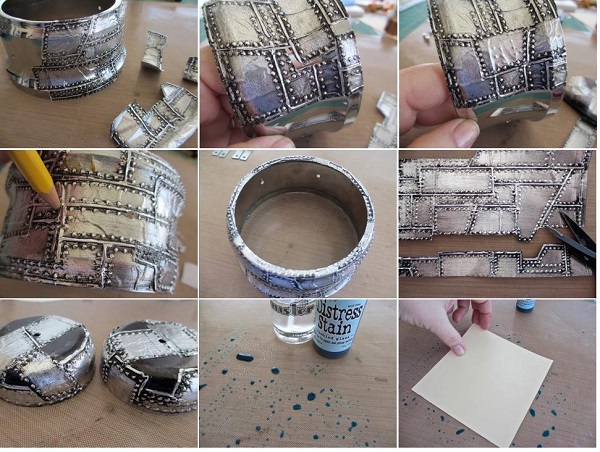
- Paint each piece with Distress Paint in Black soot. Dry the surface for about 30 second with a Heat it tool.
- Now burnish with a paper towel to remove excess black paint.
- I thought I might show you two samples I did: (picture is the above far right, middle) The one on the left is the one above: paint, dry, burnish. The one on the right is: paint, mist with water, burnish, dry. Since Distress Paint is reactive with water until dry, the water allows you to take away more of the black paint. If you take away too much, just add more. Which technique to use is totally up to you.
- Love, love, love this Texture Fade!
- At this point you have to make a decision to take the clock apart or not. I found it very easy to take apart and put back together. Every time I took a piece off, I made sure I kept the washer with it so I could remember where it went. You could always take a photo of what it looks like before you start (inside and out). One tip I will give, is that the 2 stems that hold the bells/handle up have a screw on each end. One screw end is longer. This end goes up into the bell and handle. If you remember that, then you should be fine.
- I painted the parts you will see (legs, bells, handle) with Alcohol Ink - pitch black.
- Now time for the fun part, covering the clock with the foil sheets! Cover clock in sections, cutting the foil along the lines. The foil is self adhesive so just stick it down and burnish with your fingers.
- When you have a curve that might expose the surface below, just cut a patch. No one will ever know.
- Cut a skinny strip to cover the face. I clipped the strips into 2-3" sections to allow working around the curve. Once the Foil is burnished you will not see the seams at all.
- Once you cover the entire outside of the clock, use a pencil to punch the holes so you can put it back together.
- Cut foil along lines to cover the lower edge of the bells.
- I did not cover the entire bell but again, that is just personal preference.
- Now for the inside: Squeeze out some Distress Stain - tumbled glass on to non-stick craft mat. Mist with water.
- Lay a 5 x 5" piece of Ranger Manila cardstock into the liquid and press down to get good coverage on the surface.

- Dry with heat it tool (you may need to blot off some excess liquid on a paper towel).
- Go back into the liquid several times, drying between the layers of Stain.
- I wanted to add a bit of shimmer so I repeated the same steps as above with Brushed Pewter Distress Stain. The only thing to remember is to shake all metallic colors before use.
- Metallic shine is hard to capture in photography but it adds a subtle touch over the blue.
- Use the back of the clock as a pattern for cutting the inside back panel.
- Adhere cardstock to the back and add a bit of vintage photo Distress ink on the edge.
- Every assembalage about Paris should have an Eiffel Tower, right? This will be no exception. I gathered the Paris to London stamp set, black Archival ink, and an old piece of plastic packaging.
- Stamp the Eiffel Tower on the plastic... be sure to have at least 1/2" of plastic below the tower to create a "stand" of sorts.
- Just fold the plastic back to make the stand
- What Eiffel Tower is complete without a tiny French Flag? Alright, set the tower aside while we finish the inside. Stars are in order as we saw the tower sparkle at night and it was pure magic. I painted 3 small stars with Distress Paint. I always like to give chipboard a base color in case the glitter does not go all the way to the edges.
- I gathered an Emboss it pad, Sticky Embossing powder, and my favorite color glitter, Platinum.
- Stars go directly onto the Embossing pad for "inking".
- Then transfer to a piece of paper. Cover with Sticky Embossing Powder.
- Tap off Sticky Embossing Powder and melt remaining powder with a Heat it too (they will be nice and shiny once the powder is melted).
- Return stars to the paper and cover with platinum glitter. Tap off excess glitter then dry once more with the Heat it tool (about 30 seconds). This drying step really cements the glitter onto the surface so don't skip it. I know using the Sticky Embossing Powder adds a little more steps to glittering but it is the perfect solution to glittering small delicate surfaces like leaves, flourishes and small stars.
- Lets add a message. I cut the word destination from a Remnant Rubs sheet to add to the cardstock piece.
- Then spelled out Paris, using the Tall Text stamp set. The lines on the Gridblocks helped me get the word straight (left to right and top to bottom) so I can stamp the complete word instead of one letter at a time.

- Stars added with tiny foam dots as well as the words "Follow your heart" from the Remnant Rubs.
- I used some small pieces of muslin to cover the inside of the clock.
- Then added the plastic tower about an 1" from the glass so it will be freestanding in front of the clock back. I adhered the clock to the base with very thick 3-d glue dots.
- Add the back onto the clock, making sure the words are straight.
- I added brads to a Word Band, folding the brad legs toward the back. The brads and the Word Band are held in place with a strip of Wonder Tape across the back.
- Next, color Crinkle ribbon with Barn Door Distress Stain and drying with a Heat it tool.
- Tie Crinkle Ribbon onto to clock handle. I added Tag Label and with Remnant Rub words, "Dream Big" and a Mini Numeral 3 to represent the three of us that went on the trip to Paris. The charms are hanging from a Wire Pin. Note: the Mini Numerals do not have a hole at the top, but the metal is thin enough that I was able to poke a hole with a paper piercer to add the jump ring for hanging.
- Love the way it turned out! I am super excited to give this little memento of our trip together.
Thanks for reading today and thanks so much to our special guest artist Paula Cheney!

Congrats Special Glass Giveaway Blog Candy Winner:
Please email me (Steph@SimonSaysStamp.com) with the name of the blog you won from so that I can forward your information along to get signed up for your free spot in the next Online Card Class!Blog Candy Alert! Join our following and comment on this post for a chance to win a special blog candy!

Pin It
SUBSCRIBE TO:
This Blog | Our Newsletter
WE'RE SOCIAL:
Facebook | Twitter | YouTube | LinkedIn | Pinterest | Google+
TAKE THE CHALLENGE:
Simon Says Stamp Challenge! | Vintage Simon Says Stamp & Show Challenge
Saw this clock recently and fell in love! Thanks for showing another way of altering it!
ReplyDeleteThis is a fabulous memento. I love every detail of this clock. Great tutorial!
ReplyDeletehow cool is this!
ReplyDeleteSandra ltb
I call this mickey mouse clock and had one when I was a kid. This project is truly awesome, love the makeover!
ReplyDeleteSuch a pretty clock.. Great tutorial..
ReplyDeleteWow!! Stunning creation!! xx
ReplyDeleteHOLY COW WOW!! love the POP of red!
ReplyDeleteWow, what a project!! Awesome job!! :)
ReplyDeleteWOW!! This is stunning!!
ReplyDeleteLove this cool project!!!
ReplyDeleteWhat a great keepsake! Love how you used the foil tape!
ReplyDeletevery creative!!!
ReplyDeleteWow, this is so creative and so awesome!!
ReplyDeleteAmazing project!!!
ReplyDeleteInteresting
ReplyDeleteWOW, AWESOME!
ReplyDeleteLOVE it!!
ReplyDeleteA great way to alteared a clock.
ReplyDeleteWhat a wonderful project! Great tutorial.
ReplyDeleteFantastic fun project. Really must try paint on embossed metal.
ReplyDeleteWow what a stunning piece...thanks for the tutorial.
ReplyDeleteFabulous!
ReplyDeleteOh... I need to get me some of that foil. Awesome project
ReplyDeleteWow, what a fabulous project!
ReplyDeleteBeautiful piece of art.
ReplyDeleteFantastic piece! Love the metal finish!
ReplyDeleteWOW. This is fabulous:)
ReplyDeleteAmazing! Thanks for sharing ;)
ReplyDeleteI absolutely adore paula's work! Fabulous!
ReplyDeleteOh my god, this is absolutely gorgeous Paula. Overwhelming beautifully work and sooo awesome. What a talent here, I´m sooooooooo amazed by the beauty in this project and sooo brilliant thinking. I LOVE it.
ReplyDeleteWhat a fun altered item! That intense color for the seam binding is amazing too, have to try that! hugs, Kimberly
ReplyDeleteWow, thats a great project!
ReplyDeleteWow, this is amazing!!!
ReplyDeleteAbsolutely beautiful. So inspired!
ReplyDeleteWhat a great reminder of the trip for your niece. Beautiful. Thanks so much for the detailed steps.
ReplyDeleteWow, what an AMAZING project!
ReplyDeleteWow! So creative and amazing! :)
ReplyDeleteLovely project,thank you for sharing. :-)
ReplyDeleteWow--what an awesome project!!
ReplyDeleteWow, that is very cool! I love every detail.
ReplyDeleteGreat picture tutorial!
ReplyDeletewow, that is one of the coolest projects I have seen in awhile. love it. wonderful tips and techniques in the how tos. thank you so much for the inspiration and chance to win.
ReplyDeleteWow... This is awesome. I love it. Wonderful job and wonderful tutorial. Thanks so much for sharing. Your project is amazing.
ReplyDeleteOh goodness!! This is amazing!! Some people are so talented!
ReplyDeleteOh wow i love the clock its stunning tfs daniel
ReplyDeleteWow, what a very cool momento!! Love the look of the clock with the embossing, thanks so much for sharing this with us!!
ReplyDeleteWhat a wonderful momento to make for your niece and what a wonderful experience for her to see Paris. I was in my 30s when I went. Your clock is amazing - thanks for the instructions. i thought the background paper was printed but now I know you made that too. Brilliant job.
ReplyDeleteWow! This is fabulous!
ReplyDeleteLove the use of the embossed foil sheets! I can think of so many uses for them. Gorgeous finished projects.
ReplyDeleteWow - this is an amazing project - thanks for the great tutorial
ReplyDeleteDefinitely a WOW project!! TFS!
ReplyDeleteSuch cool products!
ReplyDeleteWow, that was a truly awesome tutorial. Great project.
ReplyDeleteGreat tutorial, love the drums!
ReplyDeletei love love love the look of that distressed embossed foil tape!
ReplyDeleteI am dying to try making one or two of these clocks.
ReplyDeleteI can only imagine being able to make something like this!
ReplyDeleteWow, awesome work!! Thank you for showing us the steps. I love that embossing folder!! Thanks for sharing.
ReplyDeleteKatie B.
How creative you are. Lovin it!
ReplyDeleteWhat a beautiful project. Love it. Justamazing.
ReplyDeleteLinda
came from "one lucky day" and be exited about that great tutorial !!!
ReplyDeleteThanks a bunch for sharing it *hugs
The clock is looking such great ~yeah
CU hellerlittle
Wow this is a masterpiece!!!
ReplyDeleteWow! It looks cool and the red ribbon completes the look.
ReplyDeleteI couldn't put the clock back together, I guess.
Wow! Just wow! That is so cool. I love the riveted look using the texture fades. I think I need that one.
ReplyDeleteWow! This is really great!
ReplyDeleteOh wow, I can't believe it! That project is amazing, so creative. Hugs, Hanneke
ReplyDeleteoh my goodness!!! This is just FABULOUS!!!!!! Unbelievably gorgeous and how talented! I bet your niece will just adore this clock!
ReplyDeleteHugs,
Jo
Waauw, beautiful projects, thanks for taking the time to make this tutorial.xxxSara
ReplyDeleteDroooool! I love it! Thank you Paula for sharing the how to!!! My stamp studio is done in a Paris/French theme and now I have to have a Paris altered clock. Thanks again!
ReplyDeleteCute clock! Makes me want to work with metal again. Thanks!
ReplyDeleteOMG... this is so brilliant. amazing gift I must say:).. nothing better than a clock as a memento ..to remember the good times! Thanks for the instructions.. love the background you created.
ReplyDeleteWOWWWWWWWWWWWWW This is great .
ReplyDeleteLove it and thanks for the tutorial.
Greetings Janny
Look so cute.
ReplyDeletewow that is awesome!!! How cool is that??!!
ReplyDeletePaula is one fabulous crafter and always has the most fascinating projects!! I love this Paris themed clock - thanks for featuring Paula and her work on SSS!!!
ReplyDeleteWOW! Very cool~God bless~
ReplyDeleteOMG...I don't know what's more amazing...her project or the fact she wrote down step-by-step instructions on how she did it! LOVE!
ReplyDeleteLooks like a fun project to do!
ReplyDeletePaula Cheney wowed me with this project, just goregeous.
ReplyDeleteWhat an amazing project.
ReplyDeleteHoly jumpin....that's some project. Way to go...and I see it's been spotlighted on Tim's blog now too! Congrats
ReplyDeleteFantastic
ReplyDeleteThe clock is stunning! Fantastic job!
ReplyDeleteTres chic!
ReplyDeleteWow! What a great way to remember.
ReplyDeleteAMAZING Creation!! THANKS for sharing and have a FABULOUS WEEK!! =)
ReplyDeletewow your creation is so amazing
ReplyDeleteWow, that is some serious artwork! Thx.
ReplyDeleteI don't recall ever seeing anything like this, nor anything so stunning. Anyone would be happy to have this piece. I'm sure Paula's niece will cherish it. What a great treasure.
ReplyDeleteI was absolutely "gobsmacked" as they say in Britain, by this creation. Paula you are so incredibly talented, thanks for sharing the tutorial. Such a wonderful remembrance for your niece.
ReplyDeleteAwesome creation, Paula!! What an inspiration!!
ReplyDeleteWow!! I'm still stunned, what an amazing project!
ReplyDeleteI'm totally blown away with this project! It's incredible!! :-) xx
ReplyDeletei have fallen in love with this project. thank you for all the great photos to try it ourselves!!
ReplyDelete-Rachel w k
rwkrafts.blogspot.com
This is a very cool project. I can't wait to alter one of these clocks!
ReplyDeleteThe colors and the style would look great in my house! I am so inspired! I love your take on the assemblage clock! They others I have seen were more shabby chic, floral, or disney themed. Thanks so much for sharing!!!
ReplyDeletefantastic
ReplyDeleteWow! I saw this over on Tim's blog too. Nice work.
ReplyDeleteAn amazing reminder of your trip together!
ReplyDeleteWow amazingly cool and so detailed! Thank youforthe step by step!
ReplyDeleteVery cool, could be done with so many themes.. not just Paris. Thanks for sharing!!!
ReplyDeleteLove the tutorial. Amazing.
ReplyDeletemarilyn2222 @ hotmail dot com
follower
In a word... WOWSERS!
ReplyDeleteKris in Alaska
funamom at yahoo dot com
Knock your socks off cool!
ReplyDeleteWow! Fabulous project! I saw it at Tim's blog, it's always nice to see the process. TFS
ReplyDeleteWow ...this is an amazing project . TFS. and all of the detailed instructions .
ReplyDeleteWhoa that rocks the clock world. How neat looking. What a happy memoir.
ReplyDeleteGreat pictures too