Hi Bloggers! Quick intro today from me (Stephanie) to introduce you to our guest writer for the day, Chaitali! She has a young, fun, & fresh approach to how she likes to make her own Project Life pages. Without further ado, I'll hand the pen computer, over to her. Enjoy!
------------------------------------------------------------------------------------------------------------
Hi there everyone! Chaitali here today to share a few tips on DIY Project Life cards with you. For those of you new to Project Life, it is an awesome system of quick scrapbooking! I have 5 tips for you that I learned when I started making my own Project Life cards. Trust me, they are addictive! So shall we get started with the countdown? :)Tip 5: Use your stash!
If you are using the most common Design A for Project Life, you will need 8 cards of 3 X 4 size per week. With 52 weeks in a year, you do the math on how many 3 X 4 cards you will need. Tons! What a great opportunity to use your stash!

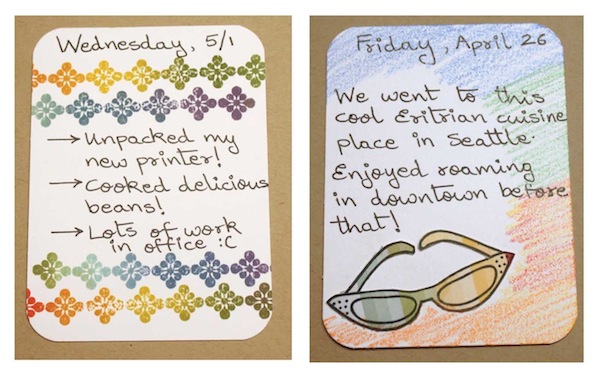
Here are 2 cards I made with things from my stash. The left one uses stamps, re-inkers and a fun DIY inkpad technique I learned from Jennifer (McGuire). The right one uses another fun stamp set and some paper piecing.
Stamped Card Supplies
{1} CAS-ual Fridays Bold Wishes Stamp Set {2} Distress Ink Refills {3} Ranger Cut-N-Dry Stamp Pad {4} Neenah Classic Crest Solar White paper
{1} TAWS Adorabowl Stamp Set {2} Studio Calico Snippets 6x6 paper {3} Neenah Classic Crest Solar White paper
Tip 4: Keep the embellishments less bulky.
I learned this the hard way when I almost mangled
my cards trying to squeeze them in the layout pockets with their bulky
embellishments. Its hard to hold off but you can do it! The good news
is there are lots of great embellishments that look just as good but
don’t add bulk to the card.
Brads Card Supplies
{1} Basic Grey Glazed Epoxy Brads {2} Copic Markers {3} Neenah Classic Crest Solar White paper
{1} Flowers {2} Studio Calico Snippets 6X6 Paper {3} Spica Glitter Pens {4} Neenah Classic Crest Solar White paper
Tip 3: Personalize Them!
Remember, they are YOUR journaling cards and you are making them yourself because you want them to be different from all the other ready-to-use cards out there! So personalize them to your needs. Use your supplies to make them extra special.
Here are 2 personalized cards I made. The left one lists all the sicknesses and Dr. visits we had that week. The Alley Way Gotta Bug stamp set was perfect for this! The right one details my husband’s birthday planning. Both are perfectly themed to the write-up because I made them myself!
Sickness Card Supplies
{1} TAWS Gotta Bug Stamp Set {2} Copic Markers {3} Neenah Classic Crest Solar White paper
{1} CAS-ual Fridays Bold Wishes Stamp Set {2} Copic Markers {3} Memento Tuxedo Black Ink {4} Neenah Classic Crest Solar White paper
Tip 2: Think of them as mini cards or mini layouts
If you are a cardmaker primarily, try thinking of these as mini cards. And if you are a scrapbooker, think of them as mini layouts. Either way, when you think of them as miniature canvases, you will open a whole new world of possibilities! All your techniques and tricks will work here too!
Want an example? How about a filler card with the Emboss Resist technique?
Emboss Resist Filler Card Supplies
{1} CAS-ual Fridays Bold Wishes Stamp Set {2} Memento Tangelo Ink {3} Memento Bahama Blue Ink {4} Memento Cottage Ivy Ink {5} Tsukineko white embossing powder {6} Ranger Emboss It pens {7} Neenah Classic Crest Solar White paper
Tip 1: Have Fun!
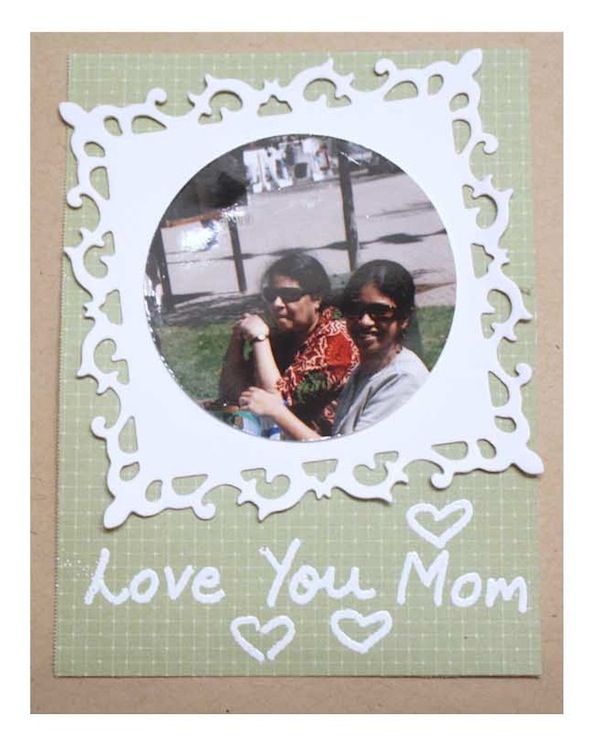
That's the main aim after all, isn’t it? :) Its interesting what you can come up with when you just think about having fun instead of trying to finish a scrapbook! For example I found that everything doesn’t have to be single layer and on a 3X4 card when I decided to have some fun...

Emboss Resist Filler Card Supplies
{1} Nestabilities Fleur De Lis Square {2} Studio Calico Snippets 6X6 Paper {3} Tsukineko white embossing powder {4} Ranger Emboss It pens {5} Neenah Classic Crest Solar White paper
Hope you enjoyed the countdown and picked up some inspirational ideas for your journaling cards! I would love to see your work if you create some DIY journaling cards!
Shop all the supplies:
Happy Crafting!
Blog Candy Alert! Join our following and comment on this post for a chance to win a special blog candy!


Love all the tips and examples, Thanks.
ReplyDeleteLovely creations!!
ReplyDeleteSo many great ideas and tips. Thanks for sharing!!!
ReplyDeleteGreat ideas!
ReplyDeleteGreat ideas! Love the pic!
ReplyDeleteLove the idea of a 3x4 card...so much less overwhelming than a 12x12.
ReplyDeleteGreat Ideas! Is there a way to apply to be guest writter?
ReplyDeleteLove the idea of making our own PL cards!
ReplyDeleteGreat ideas and tips!
ReplyDeleteThanks for the great ideas!
ReplyDeleteLovely ideas!! Thanks a lot!
ReplyDeletexxx Marianne MW
A really cool set of cards here and great examples. This should really be something we can all find out to do LOL, and then it even looks pretty cool too. I love it.
ReplyDeleteSharon c. What a good idea for trying something new each time.
ReplyDeleteGreat ideas.
ReplyDeleteGreat advice! I live just north of Seattle. I want to try the Eritrean food place!
ReplyDeleteThese are so cute... Lots of great ideas to try out on different things.
ReplyDeleteRemembering the ins and outs of life- that's fun. Great journal!
ReplyDeleteWhat a great way to capture the everyday moments.
ReplyDeleteLovely cards and wise tips!
ReplyDeleteWow!! Loving all of the FUN ideas!! Thanks for sharing and have a Fabulous Weekend!! ;)
ReplyDeleteGreat tips. Handmade is always better
ReplyDeleteThese are great ideas!
ReplyDeleteThese are such good ideas!!
ReplyDeleteI love so PL and these are some really fun ideas - TFS!
ReplyDeleteVery fun journal cards!
ReplyDeletegreat ideas - journalling cards are something new to me
ReplyDeleteNever worked with journalling cards. Thanks for the tips
ReplyDeleteIt's actually a great and useful piece of info. I'm glad
ReplyDeletethаt уou shared this useful informatiοn ωith us.
Pleasе kееp us informed liκe this. Thanks for sharіng.
my blog poѕt; adventure games online
You really hit the nail on the head when you said "Think of it as a mini layout, or card.." I will definitely look at it that way from now on and I think it will work out better for me. Great job on these examples!
ReplyDeleteGood tips! And thanks for sharing! Greetings, Gerrina
ReplyDeleteFun little cards for your project life. Love that you even keep the not so fun memories too. :) hugs, Kimberly
ReplyDeleteLove these ideas!
ReplyDeleteEspecially using up my stash of supplies!
Thanks!
Great ideas! Thanks for the inspiration!
ReplyDeleteSuch a great post Chaitali! I love your mini card idea, and your tips! I agree that having fun is so important while documenting your life. Fabulous pieces. I love the pic with your mom!
ReplyDeleteGreat tips! I love the effect of the rainbow stamped card on top.
ReplyDeleteThanks for the tips Chaitali! Project Life looks fun :)
ReplyDeleteGreat project life cards! Great idea to make diy ones, love your rainbow colored stamping technique, and you idea to add multiple layers or diecuts. I bet your pages look great. Thanks for sharing.
ReplyDeleteKatie B.
Lots of great ideas!
ReplyDeleteThis is so gorgeous..
ReplyDeleteLove this idea! Now if I can only discipline myself to keep up with this on a daily basis...
ReplyDeleteGreat ideas, thanks so much.
ReplyDeleteNeat ideas!
ReplyDeleteAll great ideas! I like the idea of making my own personalized PL cards.
ReplyDeleteLove the great tips on making Project Life cards, especially when it comes to using my stash!
ReplyDeletevery fun! Thanks
ReplyDeleteI am not a Project-Lifer myself, but I think your little journaling cards are adorable! Thank you for sharing them with us!
ReplyDeleteFantastic examples!
ReplyDeleteVery cute cards for your PL pages!
ReplyDeletewhat a very great idea. I am not a PL-er but i know many who are. I will direct them to this post. :)
ReplyDeleteSuper cute! Thanks for sharing!
ReplyDeleteAdorable cards. I bought supplies to PL this year. They are still in their boxes. :) I love to plan, never have time to follow through. I really thought PL would be an easy way to keep up. Thanks for sharing your cards.
ReplyDeleteA fast and practical netbook that may be for the more.
ReplyDeleteThough fascination with this laptop has not died, but some gaping negatives have been highlighted.
If the system is just in sleep mode then the resume time is instant.
Feel free to surf to my website: samsung chromebook
Those are great ideas! I haven't 'jumped' onto PL wagon...yet! Thanks for sharing!
ReplyDeleteSo many great ideas and tips. Thanks for sharing!!!
ReplyDeleteeva
I've seen that many comments on this matter that I could not be more perplexed.
ReplyDeleteLook at my homepage :: loan fast cash
So fun! I want to try this!
ReplyDeleteThanks for the tips! The cards look great.
ReplyDeleteWhat a great idea...I think I will make these for my journal. I love the colors and stamps. That is a great tip to keep the embellishments less bulky. Thank you for sharing!
ReplyDeleteGreat PL cards. Always love using things in my stash.
ReplyDeleteChaitali, love your personalized PL cards. I don't do project life but these would be great journaling cards on any scrapbook page.
ReplyDeleteAwesome this has inspired me to get working on my photos and documenting life! Thanks & God bless~
ReplyDeleteGood tips and a reminder to personalize and make your own cards.
ReplyDeleteI haven't jumped on the project life train yet, but this makes me a bit more interested.
ReplyDeleteGreat tips and inspiration. Thanks.
ReplyDeleteThese are great. Love the tips and idea's. My favorite is the life is amazing. Wonderful as usual.
ReplyDeleteThis makes me want to make my own Project Life cards! Great job!
ReplyDeleteI like the Life is Amazing one. The embossing looks cool on the pretty colors.
ReplyDeleteGreat ideas. I could use some of these supplies to get me started!
ReplyDeleteneat ideas
ReplyDeleteCool ideas and tips. TFS
ReplyDeleteAwesome layouts and wonderful tips! Thanks for the inspiration.
ReplyDeleteI like the idea of DIY cards! I really don't want to have the same as everyone else. Thanks for the great inspiration!
ReplyDeleteGreat layouts.
ReplyDeleteI don't do project life but these are some interesting ideas.
ReplyDeleteI don't do Project Life or scrapbooking, but you've shown me how easy it can be. I guess I tend to use my emails as my diary and to keep track of what I've done during the day. Not very creative, I know, but it's what I have time to do. Thanks, Chaitali. I really enjoy these guest spotlights.
ReplyDeleteI like this project life card ideas but I do not do Project life. I have thought of doing something similar with the divided sheet protectors you can get...thanks for all the great tips and ideas.
ReplyDeleteLove these ideas! Quick & fun!
ReplyDeleteLOVELY!!!!!!!!!!!!!!!
ReplyDeleteLove all these great tips! Thanks for sharing! :-) xx
ReplyDeleteWell done and a very personal touch for the PL pages.
ReplyDeleteLove the projects.
ReplyDeletemarilyn2222 @ Hotmail dot com
follower
Thanks for the ideas & inspiration.
ReplyDelete