Showing posts with label lisa spangler. Show all posts

Sunday, March 31, 2013

Easter made HAPPIER with Lisa Spangler!

Hi Bloggers! Happy Sunday + Happy Easter! I hope you're having a great day! I'm totally thrilled to have not one but 2 gorgeous & festive projects from our dear friend, Lisa Spangler! Without further ado, I will let Lisa explain how you can make your own versions of these beauties!

Hi! It's Lisa Spangler, and I'm so happy to be here! Today I have two projects to share with you that both feature the Tim Holtz Easter Elements die set. I love this die set, and even though it has “Easter” in the name I think it's so versatile that you can use it all year long!


First up, I'm going to share a quick and easy place card setting for your Easter table.
Shop the supplies:


Just cut two bunnies out of Hero Arts mocha paper for each place card that you need. One will become the front of the bunny and one will be the back. This die works so well that you can cut two bunnies out in one shot – real time saver! Here's another tip: Hero Arts papers are colored on one side and white on the other, so place your papers so that the white sides are touching when you run it through the machine.


Clear emboss the bunnies, then rub on tea dye and vintage photo distress inks. Next, use a bone folder and a ruler to score the bunny for the back as shown.

Next, put adhesive above the score line and press the two bunnies together. I like to use a glue stick for this as I find that it holds better.


For the nose, put a glue dot where the nose goes, trim off any that hangs over the edge, and adhere pink flocking. So cute!

To finish up, adhere a pom-pom tail to each bunny, then cut out a banner and stamp each person's name with gold ink. Adhere with foam tape and you are done!

--------------------

Next I wanted to share an idea using the butterfly die that comes in the set. This may look complicated, but it's actually pretty easy thanks to the magic of distress markers. I like to grab my trusty butterfly field guide when I'm coloring butterflies so I get some ideas for their markings. I don't worry about making them too realistic, though! 

 Shop the supplies:


Start out by cutting a butterfly out of watercolor paper. Then color the body and the wing tips. Go over them with a detail water brush and tah dah! You are on your way.

Now add color to the wings and go over your markings with the detailed water brush again like so:


Let this dry (you can help it along with a heat gun if you like.) Then add some gray and black dots, and some lines using the fine point end of the black and gray markers, then go over with water again and let it dry. Here's how it looked before going over it with water:
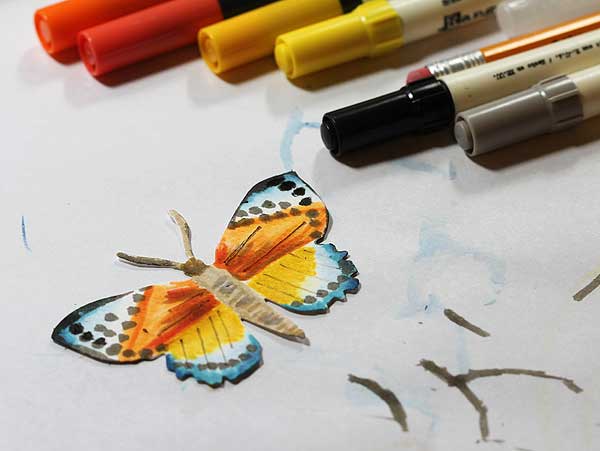
To finish up the butterfly, give it a good mist with perfect pearls and water and let dry. Just be sure your butterfly is dry before you mist it so the colors don't run too much! Here's a closeup of the finished butterfly:

To make the card base, first stamp Hero Arts' Life Can Be with Charcoal mid-tone ink on a white notecard. Then squish a tea dye ink pad on an acrylic block to make a palette. Grab a broad tip water brush and pick up some tea dye ink, and paint the upper left and lower right corners. While it's still wet, brush on some vintage photo distress ink, picking the ink up directly from the ink pad. Let dry.


Mist the card with gold, buttercup, and boss lady Mister Huey's and let dry. Then add washi tape, gold glitter tape, sew on some sequins, adhere the butterfly with foam dots. All done!

Thanks so much for joining me today! Happy spring! xo

Thanks for reading, and thanks again to Lisa!!


Blog Candy Alert! Join our following and comment on this post for a chance to win a special blog candy!


Pin It
SUBSCRIBE TO: This Blog | Our Newsletter
WE'RE SOCIAL: Facebook | Twitter | YouTube | LinkedIn | Pinterest | Google+
TAKE THE CHALLENGE: Simon Says Stamp Challenge! | Vintage Simon Says Stamp & Show Challenge

Saturday, January 26, 2013

Let's Make a Cool Card with Lisa Spangler!

Happy Saturday, bloggers! We have a very special treat for you today! Our friend, Lisa Spangler, has made a special exclusive card for our blog today! Get in the festive spirit of the upcoming holiday and follow along with Lisa's inspiration and step by step instructions on how you can create this card too! Enjoy!

I just couldn't wait to play with some new goodies from Hero Arts and BasicGrey! I wanted to incorporate some trends that I've been seeing everywhere, too: ombre, gray mixed with bright colors, and pops of metallic! This card is for Valentine's Day, but you could easily change out the inside message and the color scheme to make a card for other occasions.
 
Instructions:
   
  • Ink the heart with antique linen and tea dye inks, being careful not to tear the paper -- a pouncing motion works best!
  • Ink the BasicGrey Woodgrain Background with tea dye ink, mist, and stamp on the heart. Adhere the heart to the tag.
  • Make a card 4 1/4 square card from Hero Arts Charcoal layering paper. I love this paper since it's white on the inside, so you can do some stamping or write on it without having to line it first!
  • Use silver pigment ink to stamp the BasicGrey Heart Background on the left side of the card, then again on the right side of the inside of the card.

Stamp "Happy Valentine's Day" with picked raspberry on the inside of the card.
 
  • Position the tag on the card but don't glue it down yet!  Use a hole punch to punch a hole through the tag and the card base. Adhere the card with foam dots and tie a ribbon through the hole.
  • Add a wood veneer arrow to the heart -- love how these woodgrain arrows coordinate with the stamped background!
  • Stamp the message on a white strip and trim the ends, then adhere with foam tape.
  • Color some silver metallic decor with a Copic marker and add them to the card  -- this is a great way to get custom colors!

Shop the ingredients:


Thanks for reading today, and special thanks to Lisa, for this special exclusive!


Blog Candy Alert! Join our following and comment on this blog for a special surprise candy!


Pin It
SUBSCRIBE TO: This Blog | Our Newsletter
WE'RE SOCIAL: Facebook | Twitter | YouTube | LinkedIn | Pinterest | Google+
TAKE THE CHALLENGE: Simon Says Stamp Challenge! | Vintage Simon Says Stamp & Show Challenge

Wednesday, December 19, 2012

Hero Arts Inspiration from Lisa Spangler!

Hi bloggers! Happy Wednesday to you all! Today, I'm thrilled to bring to you TWO amazing cards made by crafter extraordinaire (and dear sweet friend of Simon), Lisa Spangler! Lisa whipped up these 2 beauties by inking up some brand NEW Hero Arts stamps from the 2013 collection! Let's take a look!

 
I love how it looks like the owls are 'snuggling'.  :)  For a brief tutorial from Lisa on how to make this card and the ingredients, see below the full shot of the card!

Ink woodgrain with tea dye and vintage photo, mist and stamp. For the owls, color on the rubber with distress markers then mist and stamp. The heart is stamped twice -- once in white pigment ink directly on the card and embossed in white, then again in worn lipstick and cut out -- really makes it pop!!! The eyes have black enamel accents and then after it dries put a dot of white! I learned that from Kathy Racoosin! Love her! (We do, too!!!)


 Isn't this palette so bright and pretty?! Just like Lisa! For a brief tutorial from Lisa on how to make this card and the ingredients, see below the full shot of the card!

Stamp the dots in worn lipstick on mandarin notecard. Ink flower with distress markers, mist, and stamp on white cardstock and round corners. Layer to punch and round corners. Adhere to notecard. Stamp flower again and cut out, then ink the edges with worn lipstick with a foam ink applicator tool. Adhere to card with a foam dot.


Thanks for reading today!

Congrats! Blog Candy Winner from: A Special TREAT from Lawn Fawn is: Valentina! Please email me (Steph@SimonSaysStamp.com) with your address and the name of the blog you won from to claim your prize!

Blog Candy Alert! Join our following and comment on this post for a chance to win this exclusive Hero Arts set pictured below. Winner to be announced soon, good luck!


Steph  


Pin It
SUBSCRIBE TO: This Blog | Our Newsletter
WE'RE SOCIAL: Facebook | Twitter | YouTube | LinkedIn | Pinterest | Google+
TAKE THE CHALLENGE: Simon Says Stamp Challenge! | Vintage Simon Says Stamp & Show Challenge

Thursday, September 6, 2012

Lisa Spangler is ROCKING NEON for Halloween in STAMPtember™


We are so excited to bring Lisa Spangler to Day 6 of our Stamptember™ celebrations!  Many of you know Lisa as the "Queen of Neon".   Hopefully you have also had the pleasure of meeting her in person.  She has an infectious laugh, a keen eye for photography, and a delightful personality that lights up a room.

Lisa started stamping during graduate school in 1994 when she discovered that stamps were a creative – and economical -- way to create cards and keep in touch with friends and family.  In 2005 Lisa was invited to create card samples for the Hero Arts catalog.  This was such fun that in 2006 she left her job as a software engineer to work for Hero Arts full time.

 
Lisa’s work has been published in several magazines, including Paper Crafts, Somerset Studio, The Stampers’ Sampler, Take Ten and Rubberstampmadness. She was on the design team for The Rubber Stamper Magazine for two years and won several Hero Arts contests.

Lisa and her husband Jason live in Austin, Texas, with their two goldfish, Smiley and Woodfin. When she's not stamping, Lisa enjoys hiking, riding her road bike or mountain bike, photographing native plants, and working to preserve Texas prairies.


Lisa speaks to us below:
card #1 - Washi Wishes :)
This card is all about the little details! I put die cut hearts from the new Simon Says Holiday Shapes die UNDER the washi tape and then burnished around them. This is a subtle detail, so add a gem to the center of the heart to call attention to it.


Also I used Hero Arts' new soft granite mid-tone ink to color the back of the Simon Says Folded Banner die cut to make a shadow -- just ink under the part that folds under the front, or else the ink will seep through!  And used it to color the hat, too. (Love love love love the banner die!!!)  (Used a foam applicator to apply the ink -- I folded it so that I could get into all the small areas -- got the idea from watching Tim's video where he curved the cling stamp!)


Finished off the hat by coloring it with neon gel pens and adding a bit of diamond stickles :)


Supplies:


Card #2 - Scary Neon: For this card, I wanted to show how you cold color the jack o' lantern stamp using neon yellow ink -- it really gives him a scary glow! Add black gems to bring out the eyes.


This time I used the washi tape as a "ground" -- love doing this with all kinds of stamps, helps make it so elements aren't "floating".


Another trick is to ink the whole stamp with neon orange, then wipe off the stem and color it with a brown marker. And one last trick! I stamped the message bubble (in white) from the Simon Says Stamp For the Record set as a cloud :)

Supplies:


Thank you to Lisa Spangler for creating these cheerful cards for our inspiration!  Be sure to check out her blog.  She may or may not ;)  have a coupon code for 25% off washi tape in our Simon Says Stamp Store...hint hint!

In stamping fun,


 Heidi and our Simon Family


Pin It
SUBSCRIBE TO: This Blog | Our Newsletter
WE'RE SOCIAL: Facebook | Twitter | YouTube | LinkedIn | Pinterest | Google+
TAKE THE CHALLENGE: Simon Says Stamp Challenge! | Vintage Simon Says Stamp & Show Challenge