
Monday, November 5 was Tim Holtz Day for our Simon Says Stamp family! We had the opportunity to learn from one of the greatest teachers in the world. Tim is not only one of the kindest, most fun people you'll ever meet, but he is charismatic, funny, smart and so full of energy. He was generous with his time, resources and his wealth of knowledge. We welcomed Tim and Mario into our offices for a special day filled with learning and fun! They run a very well oiled machine and are are incredibly efficient with their operation!
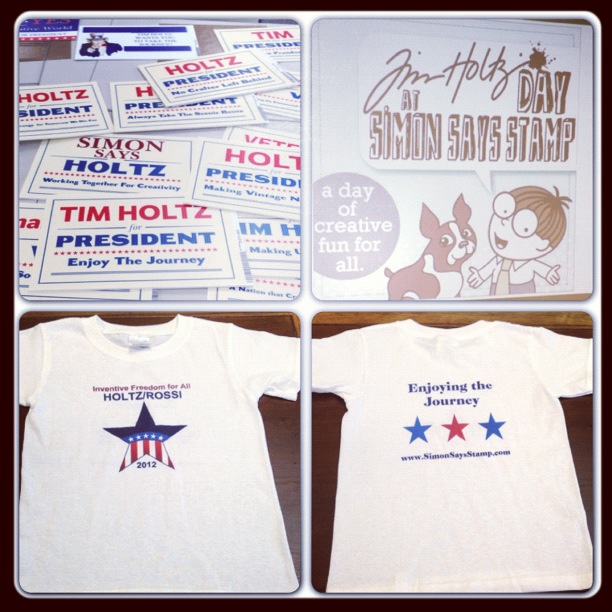
With election day upon us and Ohio receiving national recognition as a "swing state", we decided it was time to put our vote to work! Holtz/ Rossi for President!

Simon Says Stamp strives to deliver:
- Quality Products
- Proactive Customer Service
- One Stop Shopping
- & Fresh Inspiration
to our customers all year long. We consider Employee Education
critical in accomplishing this goal. Our customers deserve the best and
we want to give it to them!

Tim taught a 5 hour class and gave us the opportunity to ask questions about products and their uses.
While we worked hands on with many Ranger products from stickles and glue to crackle paint and distress inks, Tim told us intriguing stories about how some product lines came to be. We learned some tips and tricks and problem solving ideas to teach our customers. While we were encouraged to get inky, let creativity rule, and experiment with different products, we were cautioned to discourage spraying alcohol inks and blending solution (due to health concerns) and be careful with color wash as its intesity can be messy if you're not careful.

Top Left: Tim Holtz Sizzix Texture Fades
create an embossed image deeper than most other embossing folders.
This makes them ideal for using on grunge and then inking a second color
to really accentuate and bring out the embossed image.
Top Right: I really enjoyed collaging with the Idea-ology Tissue Tape.
It's different than washi. It's made out of tissue paper, not washi.
Tissue tape does not stick to itself. We learned a cool trick....tissue
tape is an inkable surface. Ink it with distress and then apply Ranger's glue and seal.
Not only does the glue and seal keep the tissue tape from "coming up",
it also enhances the color of the ink and makes it much, much brighter!
Bottom left: If you have trouble with your foam pads sticking to your distress tool,
it's because the foam is actually stronger than the glue used to attach
the velcro to the wood handle. Just use a staple gun to adhere the
velcro to the block. Guess what!? Distress tools that have been manufactured more recently are now coming with the velcro already stapled.
Bottom Right: You can use a heat tool
to help your crackle paint dry. The cracks will appear different then
the organic cracking that happens when you allow the paint to dry
naturally. Decide what look you like best for your work. Ink between
the cracks to give a beautifully aged look to your surface. Ink with
different colors to add interest and depth.
Did you know that Ranger Distress stickles are different than regular stickles? You can dry them with a heat tool.
Do you like the paint in your paint dabber to be a little thinner for application? Just add water. It's a water based paint. Did you know you can put your craft sheet in the dishwasher. I had no idea. Cool, huh!?
Don't use the Tim Holtz water brushes to apply alcohol ink. The alcohol will eat up the plastic in the brushes. However, the water brushes work beautifully with Distress markers! Distress ink loves to react with water.

If your cling stamp loses it's "clinginess" to an acrylic block, just wash the back of it with water. Chances are the oils from your hands or the inks you might be using are preventing the stamp from clinging to blocks. Try to avoid using oil based cleaners to wash your stamps. Oil and water don't play nicely together. Your distress inks won't evenly stamp if there's oil embedded somewhere in your rubber stamps.
We are forever grateful to Tim and Mario for working so hard. They help keep the spirit of the industry alive. These are definitely two of the hardest working people on the planet.
I know this is the best industry in the world and appreciate all of the good kind creative people that are its heartbeat. My life is beyond blessed to be surrounded by such fine folks every day.

Simon Says Stamp
is truly a family affair. Our team is our family. I guess my love for
crafting is contagious because our son Jax is an eager inker!
Crafting together is the best place to be :)


We have a tote bag we'd love to give away. Please tell us any of your
cool tips and tricks that you have for crafters. We'd love to hear
them! One random lucky winner will receive the tote bag that Sarah and
Stephanie are excitedly displaying!

Thank you for supporting Simon! We are working every day to be better for YOU!
THANK YOU TO TIM AND MARIO for taking time out of their VERY busy schedule to give us a day of education and inspiration!
In stamping love,
Heidi & Our Simon Team
Heidi & Our Simon Team
Pin It
SUBSCRIBE TO:
This Blog | Our Newsletter
WE'RE SOCIAL:
Facebook | Twitter | YouTube | LinkedIn | Pinterest | Google+
TAKE THE CHALLENGE:
Simon Says Stamp Challenge! | Vintage Simon Says Stamp & Show Challenge
How fun your day with Tim and Mario must have been, I can't think of a better way to spend the day. Love all the tips in this post.
ReplyDeleteWhat a fun day! WIsh I could have been there. My tip...I put velcro dots on the bottom of my distress inks to hold the foam. Works great!
ReplyDeleteJust a wealth of information today. I saved several of the tips in Word docs.
ReplyDeleteWhat an awesome day that must have been!!!! I love the tips too! I like Marilyn's idea to use velcro dots to put the foam pads on the bottom of the ink pads. I use just a little strip of double stick tape to attach mine.
ReplyDeleteI can just imagine this fun day. Thanks for all the tis and ideas.
ReplyDeleteThanks for sharing all the tips and tricks you learned! I read the SSS blog everyday, thanks for all the inspiration and info,and of course the access to all the great products
ReplyDeleteWow! What a great day you all must have had. The 2 most creative guys on the planet and the best stamp company ever! I can't think of anything better. I, too, have velcro on the bottom of my distress ink pads so that I have have the correct pad with the ink. I have all my "Timmy stuff" in one carry all storage unit so I always have them all when I need them. Blending solution , alcohol inks and felt in one section, dabbers in another, distress stains all together, inks in another section. Love everything Prez Tim does!
ReplyDeleteThanks for these great tips! My only 'tip' would be to have a place for everything and always put everything back in its place. I learned and keep re-learning this the hard way by wasting a lot of my precious crafting time looking for things I can't find when I need them. ;-)
ReplyDeleteI craft on a old wooden dining table. I have a craft sheet but it is only so big. I like to get messy when I do crafts so, I put a large plastic tablecloth over my table to protect it from all the sprays, inks, and paint that stray from my projects. My tablecloth happens to be Halloween themed, and at this time of year you will probably be able to find them on sale! That's two tips :)
ReplyDeleteLove the tips from Tim, wish I could've been there!!
What an exciting and fun day! Such great tips for crafting. Thanks for all the info!
ReplyDeleteThanks for sharing these tips! My tip would be to use the paper where you cut out a die as a stencil for a background, or, if you have cut out a form like an open flower, to use that flower like a stencil with all sorts of ink, mists, even versamark and emboss it. If you want to use the form as a stencil many times, you could try to cut the die through a mica sheet.
ReplyDeleteI'd vote for Tim & Mario, especially if crafting were to be a paid job or you could do it at work. lol A tip I've found particularly useful lately is to use a clothespin to hold the art you're heat embossing. If it's flat on your work surface it actually takes longer to emboss. So not only are my fingers cooler but it's faster. I'd love to win that tote...way cool!
ReplyDeleteLooks like it was a fun day. My tip of the day is that Tim has a app for your I-pod/I-phone device. It keeps track of your ranger inventory... and when you see that awesome sell that you can't pass up... check you device and to be sure not to buy a duplicate..... Thanks for sharing your tips with us.
ReplyDeleteLove those tips from Tim. My tip if you can call it that, is using washi tape for adhering vellum, most crafters stay away from vellum because of the adhesive that shows through. Your design might just look lovely too!!!Thanks for the chance to win that awesome tote!!!
ReplyDeleteLove all the tips! And the pic of Mario with the VP sign is priceless! Oh to be a SSS employee and get to have all that free instruction...what an honor and what fun! (Can I work from SC?)My tip: Be sure to follow Tim's blog. Even if you can't find the time to participate in the 12 Tags, be sure to read through the tutorial. He provides lots of useful information every month.
ReplyDeleteWhat an exciting day for all of SSS employees. Inky fingers is a must when you craft with Tim. My tip? When die cutting, die cut multiple images at a time and place them in a plastic tub for future projects. That way, you can put together a card in no time when in a pinch. I also gather all my supplies in a plastic bin when creating cards. Everything is at hands reach when in need.
ReplyDeleteHow very exciting!!! Here is a fun tip for your distress pads and your foam pads... I use the little photo square adhesives, one on each pad and I use it to keep my foam pad for each color together!
ReplyDeleteWhat a dream day you had! Thanks for sharing all the tips you learned with us.
ReplyDeleteMy tip is to use painters,(blue), tape to tape down stencils. It holds tight but removes easily without leaving any residue.
Looks like a fantabulous day!! Thanks for sharing and all of the tips! Love Tim n Mario!!
ReplyDeleteTim and Mario are so much fun! I have had the wonderful opportunity to also take one of their workshops and LOVED it. I also took the online workshop and that too, was awesome.
ReplyDeleteI think my favorite thing is the Distress Inks and how they react with liquid (water, mist)! A truly unique and fun product!!
Thanks for the great tips. The first tip I got when I started to papercraft was get inspired by others through blogs and Youtube videos. It has been a great source of inpsiration, tips and tricks.
ReplyDeleteLooks like you had an awesome time with Tim and Mario! So fun. :) I have a tip about heat embossing: if you heat the back of the paper a little first, it sets the powder to keep it from flying off and helps the paper not to warp. :)
ReplyDeleteWhat a great day that must have been...thanks for the tips! I know that when I get heavy handed with the distress inks on a background (which I love making)a few spritzes of water blends things down like magic...it's amazing! Love it and thanks for the giveaway
ReplyDeleteKind a jealous! Looks like so much fun!
ReplyDeleteI use velco to attach my ink blending foam to the individual ink pads.
ReplyDeleteThis day looks amazing! i wish i had a good tip. this only one i can come up with is i use a manila folder to put under my projects when using embossing powder/glitter/etc... then just fold it and pour the extra back in the bottle :)
ReplyDeleteI'm sure it was an amazing day! As for a tip/trick... hmmm... store your ink pads in an old 80's cassette rack is always my best.
ReplyDeleteSounds like a great time was had by all, one of these days I'm going to take a class with Tim. My tip is to print out a chart of distress ink names and use a small stamp to stamp every color out. I then laminated the sheet and keep it handy on my desk. Shari (cricutrookie)
ReplyDeleteI'm not good at coming up with spur-of-the-moment things, but here's my list (so far):
ReplyDelete1) I use an old "year at a time" calendar that's about 24x36 that you can write on/wipe off under my craft mat to cover more area and keep my work surface clean.
2) Save your dryer sheets for amazing textures when spray glued and glittered to the top of cards for a great snow/ice effect.
3) Use little round labels to mark the color of your distress inks or anything else that comes in a bottle. Attach it to the top so you don't have to paw through the whole box and try out each one to find the color you want.
4) Be open to the idea possibilities that might be lurking in other craft mediums and to all that's around you. Inspiration can come from anything and happen at any time.
Thank you for sharing Tim's tip! Mine is to shop at SSS! They have the products you want or will get it for you and they ship fast!
ReplyDeleteThank you for sharing Tim's tip! Mine is to shop at SSS! They have the products you want or will get it for you and they ship fast!
ReplyDeleteThank you for sharing Tim's tip! Mine is to shop at SSS! They have the products you want or will get it for you and they ship fast!
ReplyDeleteare you guys hiring?! I'd LOVE to work for Simon Says Stamp, ya'll have so much fun there! Loved this campaign, and Tim is SUCH a great teacher!
ReplyDeleteThanks for the tips!
ReplyDeleteWhen you don't know which color of an embellishment to buy (flowern pearl, rhinestone...) just go for the clear or white one: you'll always be able to color them with you alcohol inks to match your project perfectly!
Wow, sounds like a great day! Thanks for sharing all of the tips! I think all of the tips I have learned have come from watching the videos on Tim Holtz's website and reading the 12 tags posts around Christmas. My tip:
ReplyDeleteAlcohol ink is great for coloring glossy paper, acetate, foil, metal objects. Add it to water in a tub and dip paper or ribbon in to make your own individual paper (something I recently tried, love it!).
Thanks for sharing.
Katie B.
Fab tips in this post,thanks so much for sharing! I use a sheet of oil cloth table cloth for my desk as its waterproof and heatproof. This allows me to be as messy as I like with inks and sprays at my desk!!
ReplyDeleteTim for president....but then he wouldn´t have a minute for crafting and inventing cool crafty tools any more - no way!
ReplyDeleteMy tip: I have a draweer underneath my worktable, where all the leftover scraps of paper go (not the teeny weeny ones, but the usable sizes). That way, when I need a small piece of paper or a colour idea, I just open my drawer and look through all the scraps. Also, I use up more of my leftovers!
Greetings, Christine
PS: Thanks for sharing this great time you had with Tim and Mario and all you´ve learned
Thanks for the fab tips...my tip: follow Tim's blog, use his Compendium books and order at Simon Says!
ReplyDeletexxx Margreet
I would love to have a day like you all did, learning new techniques from a pro, and getting inky in the process.
ReplyDeleteFabulous photo's ,, lovely to see you all getting inky, especially love the photo of Jax helping his Dad, he looks like he knows exactly what he is doing :-)
ReplyDeleteGreat tips too, love the one of using velcro to keep the foam pads on the bottom of ink pads, especially for the colours that you don't use so often :-)
My tip is to keep paper packs in cellophane card covers or plastic bags once opened so that any scraps are kept with the pack, perfect to keep for paper piecing and edging strips, die cutting etc.
luv
Lols x x x
Thanks sooo much for sharing all these great tips with us here and for sharing the wonderful day, you had too. I´m so envious he he.
ReplyDeleteMy tips will be to always save even the tiniest piece of scrap, and then I sometimes make a new sheet of paper as collage with all the tiny pieces and ink it with some distress ink, that fits the colorscheme I want to use for my project. You can use everything completely up this way and it gives some really awesome new papers this way.
TFS, you lucky ladies! Tip? When I use spray inks I do it in a box. In that box I have a piece of the backing sheet from some contact paper (which I used to cover some binders that I store my stamps in). I lay that down under my paper. The excess spray does not soak into the backing paper so I can pick up some extra dots if necessary, or use a piece of scrap CS to use up the excess ink instead of just wiping it clean.
ReplyDeleteMy tip is to use your soda cans and plastic bottles with your TH dies, they are so much fun to alter with inks, stains, powders and sprays....
ReplyDeleteThe new Christmas ornaments like the stocking come out so beautiful using a soda can....
What a fun, educational day ya'll had! TFS the pics and projects and all the tips. I don't know if this is a tip or not but ... sometimes when I want to create a "raised" image on a card, I die-cut my main image from thin fun foam. If I happen not to have the color I need, of course, I ink it! No need to use foam tape or dimensionals as the die-cut is already raised. :)
ReplyDeleteMy tip is to use the tray that you are supposed to use to tip the embossing powder into as the tray to hold the card etc that you are heat embossing. The reason is it has a little lip on it that keeps the cardstock on the tray and your fingers don't get in the way and get burnt. And I tip my embossing powder into a takeaway container with rounded corners that I can tip easily back into the small containers that the embosing powder comes in. This means I have just container too for all colours, saving storage space.
ReplyDeleteWOW...what a great day you all had and WOW too about all the tips you gave.
ReplyDeleteI have a tiny tip..I took a piece of scortape...added paper...punched out 1/2"circles...added the number and some ink from my Ciao Copic marker and now I can see the numbers and colors too while they all stand up in glass jars(ones which had first Bon Maman jam in it ..so free)..each jar holds a color so the B's Y's R's and so on...only the E's are divided over 2 jars ..so cute and handy!
My tip is to think out side the box and let your creativity flow! If you get an idea try it. Thanks for all the tips and photos. Looks like a fun day. Tim rules, lol!
ReplyDeleteWhat an incredible opportunity. My tip is "play everyday".
ReplyDeleteI try to keep all of the same themes together in one storage box - makes life easier and quicker.
ReplyDeleteWow, what a fun day that sounds like! Thanks for sharing. I can't think of any tips to share, but love the tip from one of the commenters about putting the distress ink pad on a velcro dot with the ink it matches to keep them together! LOVE my distress inks!
ReplyDeleteWOW! I wish I had been there, sounds like it was a terrific experience.
ReplyDeleteMy tip: whenever you use any product with a flow through applicator such as Stickles or glue, when you are finished tap the container on the table top before capping, this will keep the tip clear for your next use without clogging
My tip is for creating your own 'pop dots' or strips of dimensional adhesive. If you have double-sided tape and fun foam, just run tape on one side of the foam, cut that strip off, turn it over and apply tape to the other side. Cut to the size you need. Instant dimension. Besides being an emergency replacement, you can create dots in whatever color you want - so that white pop dot doesn't show up on your nice black Halloween card.
ReplyDeleteThat's why I buy his products, and that's why I buy them from SSS....always!
ReplyDeleteMy tip....with all your dies,cut out a bunch with a variety of colors, cut and roll up those hand made flowers and have a bunch on hand. Sometimes when a design/layout is hard to imagine, it helps when creating just by grabbing something ready and building around it. And many times it's great when you have to put something together quickly.
Laura
What a fun day! Wish I could have been there for the lessons :)
ReplyDeleteMy tip: work on ONE project at a time, and clean up RIGHT AFTER THE PROJECT IS DONE. I know, super simple, but it does keep things more organized in your craft space :)
Also, if you need to make lots of one card, do it assembly style, where you do all of one thing at a time.. such as stamping, then do all the die cutting, then embossing etc.. makes the time go much faster.
My tip is...USE the goodies that you have! Cut into that paper, open those inks! Take time to play with your supplies-don't save them just for that "special project" that we all wait for! Once they are used up, find something new to fill the storage space-no guilt-LOL!
ReplyDeleteI have been following the Ranger and Dreamweaver Stencil 4 Weeks of Inspiration learning all sorts of NEW ways to use my Tim Holtz Distress Embossing Powders and you will NOT want to miss the NEAT techniques they have been sharing!! I have made several projects using them and have been RE-FALLING in LOVE with my Distress Embossing Powders!! THANKS for sharing and for the chance to win!! Have a FABULOUS WEEK!! =)
ReplyDeleteAwesome tips today! Some are new-to-me, slap my forhead; wondering why I didn't think of that before. Esp. like the Stickles and tapping on counter before capping. So simple but effective. Many more like that. My tip: I have put a drop of ink on the top of some bottles so I can see the ink color quickly, too. Also, make extra dies when making something for a card and they'll be there for the next time. I have the Grand Calibur and the plate is large enough to run 5-6 thru at one swipe of med. sized dies. Love it!
ReplyDeletelove all of the ideas shown here... and so many great tips being posted.
ReplyDeletemine is more along the idea of recycling -
I save all of the little tags and strings from my tea bags. they are perfect for stringing through buttons and add the ideal vintage look since they have been 'tea stained'. the tea tags can add the neatest touch to certain projects.
Love the SSS Blog! My tip would be, using plastic containers to store my embossing powders. I like to use the gladware interlocking lids with container because they are wide and when using the powder it stays within the container and not my work surface!
ReplyDeleteThanks for sharing all the fun and the tips. I had no idea about the alcohol inks and paintbrushes or the dishwasher for the sheet..so fun! My favorite tip would be to make sure you have a Ranger Craft Scrubbie for cleaning your hands. They take off paints, stains, inks and even adhesive easily. I always keep two on hand.
ReplyDeleteThank you for sahring your insights of that fantastic day. Thanks for sharing all the tips too. I don't have any 'original' tip as I'm quite new in this, but I do appreciate all you shared today.
ReplyDeleteHow lucky you are. I wish I could go to one of Tim's classes. I don't know if my tip is new, I suppose it isn't but I use it almost every day. It is to put a very small drop of glossy accents y my knots. This way, they never untie. :)
ReplyDeleteLove Tim and Mario...big fan of the art Tim shares with us. I'm using perfect pearl spray quite a bit with the distress products but find it a little messy, so I've lined a plastic bucket with a towel to contain the over-spray. No more mess on my desk and my project can dry out of the way.
ReplyDelete;) Onepinkdaisy
Thanks for sharing Tim's tips. My tip, I wrap foil on a clip board and use that for embossing or drying with my heat tool. It keep the paper from bending. The clip saves my fingers, too.
ReplyDeleteThanks for the tips and a look at Tim and Mario's visit. It must have been so much fun. My tip would be to not get discouraged or upset when you "make a mistake". There is usually a way to work around it or use the "mistake" in your art. I am working on that myself.
ReplyDeleteSounds like you had a wonderful time of learning and crafting with Tim and Mario! Thanks for sharing your tips; and thanks to all of the gals who have commented with their own tips! My tip is to save all of the packaging in which your craft items come; you never know when they can be of some use in a project.
ReplyDeleteWhat a great time! My tip is to store as many of my things in plain sight as I can. That way I know what I have and can be inspired by a particular stamp or paper pad.
ReplyDeletewhat a great day yu had, I'm totally jealous. My tip is to use an old magazine for gluing, turning the page as it gets messy, so I always have a clean surface to glue on. when all the pages are stuck together I just toss it in the garbage.
ReplyDeleteLooks like a fabulous and very creative day!
ReplyDeleteMy tip... Save the die cut negative part of the papers to create with. So you get both the positive and negative to use.
DeniseB
I'm so glad you all had fun together, and I still say Tim would make the best prez :) TFS all these great photos!
ReplyDeleteMy best tip is that of my hat to Tim Holtz for all he does for the world of stamping!
Thanks for the tips! This is an awesome post!
ReplyDeleteWhat an amazing crafting day. I keep an old broiler pan with my non stick craft sheet in it, and my heat gun for embossing. And I always unplug my heat tool when done. Because it can get turned on too easily and we certainly don't want that when not needed.
ReplyDeleteWow! Sounds like you all had a blast with Tim and Mario. As for tips, off the top of my head I guess my tip would be to use a piece of plastic canvas to line up marks you need to guide where to space your brads or eyelets. I just cut a piece the size of an A2 card and then just use a pencil to mark where I want holes to be. Hope this makes sense. Thanks for a chance to win. :D
ReplyDeletewow how much fun and what a learning day it would be to hang out with tim. along with a new favorite of mine kristina werner too. that would be awesome..
ReplyDeleteA new thing I started doing in crafting as a new die cutter I use both parts of the paper after cutting it.
I use the paper I cut from as a stencil for art journaling..
Also a tip or just a lil fyi I recently bought a thick soled pair of summer clearance foam flip flops and used them to make stamps using them and a razor blade.. worked great. erasers work great to carve out stamps too. I think everyone already knows that though.. thanks for all your inspiration and chance to win some goodies
TONS OF GREAT TIPS HERE! THANKS sss AND EVERYONE. My tip is tried and true, and recycle green, but also a lot of fun. Don't discard your teabag after you've infused your cup. Dab it on whiter paper instead, you will get the loveliest antiqued paper. Try creasing the paper here and there, as the tea will add interest to the creases. And at last, iron it all for sealing the tea. If you want to keep it crincled up, use the heat gun.
ReplyDeleteWOW oh WOW, I am so envious of you all at SSS, you lucky people having 'The King' that is Tim Holtz, come over to give you all his tips and techniques, I love everything 'Tim', thanks for sharing some of the tips you learned.
ReplyDeleteMy only tip, and it is helping me at the moment to organise, I got some 4-ring binders and some see-through pockets from the local office supplies store, and I'm in the process of putting all my stamps into the pockets, it is a quick and easy way to see what you have, and it's surprising just how many stamps I do have ha ha !!!!
Great bag, I'm envious all over again, congratulations to the winner.
Lots of love from Patricia xx
Oh, and another tip. Use and old bathtowel on your chair, while stamping. That way you can clean your stamps just by rubbing them off on the towel on your seat. So handy! Make sure to use an old towel as they don't shed so much lint.
ReplyDeleteWhat a fun day with Tim and Mario - I am so envious! I love making one-of-a-kind cards but lately have been making at least two cards at a time - I may or may not use the 2nd card but at least it is ready! I also have bought some burlap and spread glue lightly on one side and let it dry. Now it is ready to cut and add to cards without totally coming apart - adds a natural look! I love the tea bag idea and am going to go back and read all the other tips!
ReplyDeleteSounds like a fun time! I put velcro dots on the bottom of my distress ink pads to hold the foam inking pad.
ReplyDeleteI vote for Holtz/Rossi! Think of all the cool signs, distress, grunge, alcohol inks, crackle paint, stickles, accoutrements, well you know what I mean.
ReplyDeleteMy tip, I made little matchboxes (out of the same paper I do most of my stamping on) to hold my foam. I then rub the ends of the boxes over the ink pads and I can see exactly what the color will look like on my paper. To make it easier on me, because I can't remember names, I printed labels to put on the end of the box. To keep the matchboxes organized, I glued them in stacks of five and glued three stacks side by side. Finally, paper on the back side of my stacks so I couldn't push them all the way through and a strip on the sides, top and bottom because they are in a room with lots of paper. :)
Wow. Wish I could have been there! SSS sounds like a great place to work--i guess that is why your service is so good.
ReplyDeleteMy tip: I keep my distress ink pads in an old cassette holder. I write the color upside down on the 4 sides of the ink pad in white ink and store the pads upside. Voilà, the pads are easy to find and easy to store.
Oh my gosh, I wish I could have been a part of it. I just learned from Tim yesterday at the Carson Rubber Stamp Show that I can use alcohol inks to make his colors of glitter with Rock Candy. I'd love to win your prize!
ReplyDeleteWhat a great day you all had to have! I'm so jealous!
ReplyDelete